BudgetWrangler User Guide
©2017-2020 Sir Reel Pictures All Rights Reserved
INTRODUCTION
All the other Personal Budgeting software on the market sucks. There’s no way to sugar-coat it. I’ve tried most of them. They’re either too complicated or they don’t do what you need them to do. And even the really good ones still contain deal-killers. Even the best of them are so buggy or confusing as to be un-usable. Whenever something goes wrong you’re usually on your own. We, the normal people, need something simple that doesn’t force us to give up control and yet allows us to do what WE need it to do to understand our finances.
So out of desperation I created this Filemaker-based Budgeting program called BudgetWrangler. And I thought other folks like yourself might appreciate its simplicity.

With BudgetWrangler you can:
• Easily see your financial health at a glance.
• Keep track of your income and expenses, sort and analyze your finances in flexible ways.
• Set up a budget and track how you’re living up to it.
• Create Goals and manage them as circumstances change.
• Quickly answer the question “Can I afford this?”
• Set up reminders of upcoming payments.
• Print Reports for Tax Time
BudgetWrangler is different because:
__________• It’s more accurate, more secure, and more reliable than Cloud based systems.
__________• BudgetWrangler thinks about money the way real humans do.
__________• You retain maximum control over how your data is imported and formatted.
__________• You can categorize more records in less time than any other financial program.
__________• BudgetWrangler’s features are designed to help you work your way
BudgetWrangler does NOT :
• Charge a monthly fee
• Show you ads or try to get you to buy something.
• Manage your Investments (but you can enter the data from your account and track it.)
• Automatically import data from your accounts. (You want more control than that.)
• Supply a mobile app (but Filemaker Go will allow you to run it on your mobile device)
• Wrangle actual cows.
![]()
OVERVIEW
I’m more of an artist than a financial guy. So I don’t eat, sleep and breathe spreadsheets. But I still needed something to help me view my finances the way humans look at things.
Enter BudgetWrangler.
Although you can find many of BudgetWrangler’s features elsewhere in other programs, the difference is BudgetWrangler just works. It’s not overburdened with features you can’t even figure out, much less use. And it thinks more like you do and not like your bank wants you to. Plus BudgetWrangler is a compilation of some of the best features of the other software on the market, but without needless complexity and feature bloat.
BudgetWrangler seeks to be as simple as possible
and is primarily designed to answer three main questions:
1. WHERE HAVE I BEEN? You can view how you did in any month or other period regarding your budget. You can compile a year’s worth of records from any or all your accounts with assigned budget category subtotals to be used at tax time.
2. HOW AM I DOING? Quickly determine where you stand budget-wise at any time so that dealing with unexpected expenses is not a mystery.
3. WHERE AM I GOING? You can set up individual monthly budgets for a whole year. Or you can explore some “what if?” test budget scenarios using the Worksheet.
CONVENTIONS
One Year at a Time
BudgetWrangler focuses primarily (as you do) on the current year, January through December. It does not have a rolling calendar. For tax purposes you’re only concerned with one year at a time so for simplicity’s sake BudgetWrangler does the same. You can view Transactions for previous years or any arbitrary period you wish by simply using the date range fields at the top of the Transactions Window. And you can do theoretical budget studies for the future in the Budget Worksheet window. But the Budget itself and most analysis tools focus on THIS YEAR.
Control your Imports
You may be annoyed that BudgetWrangler doesn’t automatically import your latest records from your bank. Don’t be. It’s actually a good thing. Yes it’ll take you a couple of extra minutes each time you want to work in BudgetWrangler. But what you gain in control over those records and exactly how they are imported is worth the effort. Any of the auto-import programs we’ve tried always come with bugs or quirks on the import. Or inability to examine or manipulate the records in the way you need to. And if something goes wrong there’s NOTHING you can ever do about it except live with it or use another program. I don’t know about you but I don’t like abandoning my financial management abilities to a faceless software company that mangles it and then charges you each month for the privilege.
Why Filemaker instead of a normal Application?
Filemaker allows us to do not only what’s built in to BudgetWrangler but all the sorting and finding and analysis tools that are sitting in Filemaker waiting to be awakened to do functions you haven’t even thought of yet. It’s perfect for this sort of application and it’s versatile and easy to examine your data your way.
Select both the Period and the Account(s)
In most BudgetWrangler windows you need to select both the Period of time for which you wish to view records using the Date Range Selector and the Account(s) you wish to display using the Account Selector. You’ll find this to be a very powerful way of viewing your data. Simply select from the pull-down menus in the header bar.
Refresh Yourself!
In several of the main pages you will find a “Refresh” button in the header bar. If you have been doing specialized manipulation of your data through finds or sorts or other functions you can use the Refresh button to return to the parameters set up in the Date Range Selector and the Account Selector.
Use the Buttons!
Some BudgetWrangler functions have similar counterparts within the Filemaker Menu Bar items. In general, however, whenever possible it is better to use the BudgetWrangler buttons to do what you want to do rather than Menu Bar selections as most of these buttons do behind-the-scenes work that will keep your workflow smooth. The exception to this rule is that everything in the Scripts menu is custom to BudgetWrangler so all those items are safe to use.
Quick Tour
THE MAJOR WINDOWS
You’ll spend most of your time in BudgetWrangler in four major pages: Transactions, Summary,Overview, and Budget.. These pages are always accessible by the green buttons at the top of the header bar. Additional Green Button pages are Scheduled Transactions and Goals.
All these pages are windows that are used to look at your data in specific ways so that you can understand it and answer questions about your budget for yourself.
________________________
NOTE: The Green buttons are generally for accessing the major function pages. The Grey buttons open pop-up windows that help you understand and work with data on the main window or to perform side tasks.
________________________
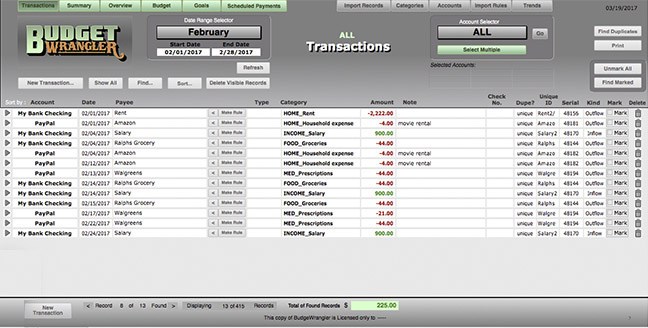
The Transactions Window offers the most complete list view of all the fields of the records you are browsing. It is here in this window that you will begin your Import process to get data that you downloaded from your bank or financial institution into BudgetWrangler. You can also sort by any of the content types by clicking on the column headers. In the header bar you will find two pulldown tools where you can select the date range for which you wish to view the records (The Date Range Selector) or which account or accounts you wish to display (Account Selector). These tools also appear in the other windows as appropriate.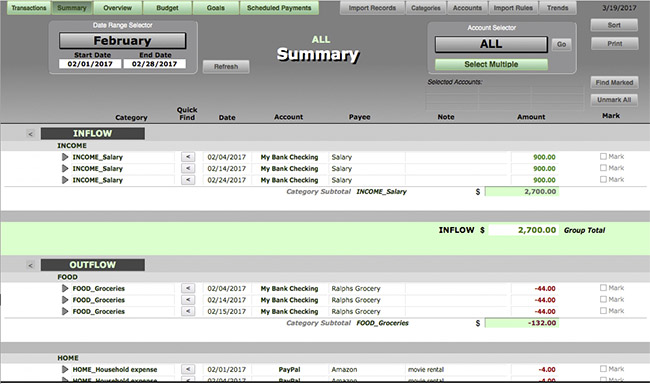
The Summary Window shows you a sorted, sub-totaled view of the records you’re displaying so that, for example you can see how much you spent on a given category in one or more of your accounts.
Simply pull down to select a month and an account and you get a quick look at all your expenditures and income for that combination of parameters.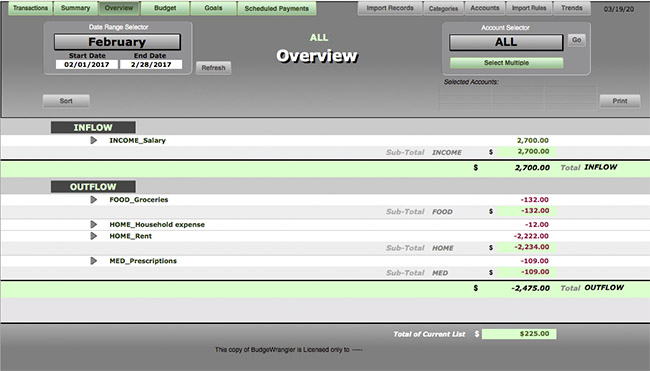
The Overview Window displays only the subtotals of all your spending and income categories for the dates and accounts you select in the header bar. It’s a real quick, high-level look at comparative cashflows in your categories.
The Yearly Budget Window lays out all your categories in a grid style for the current year. Here is where you enter the target amounts you hope to adhere to as the year progresses.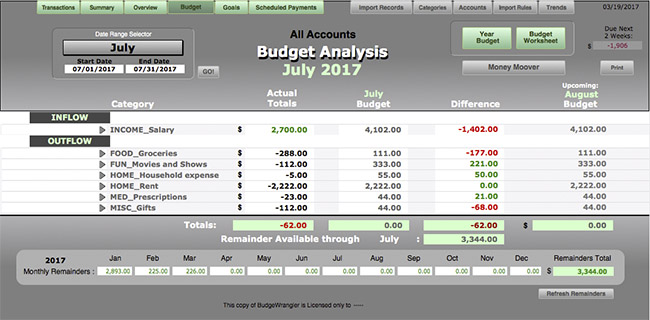
The Budget Analysis Window is the heart of BudgetWrangler in that it is the primary tool that allows you to view what you’ve spent in a given month or period vs what you budgeted for that period—and the difference so you can make informed decisions.
THE MINOR WINDOWS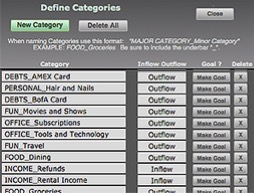
In addition to the green-button major windows there are a number of grey buttons that provide ways of getting more in depth with your data or allow you to set things up. These minor windows are Categories, Import Rules, Accounts, and Trends. 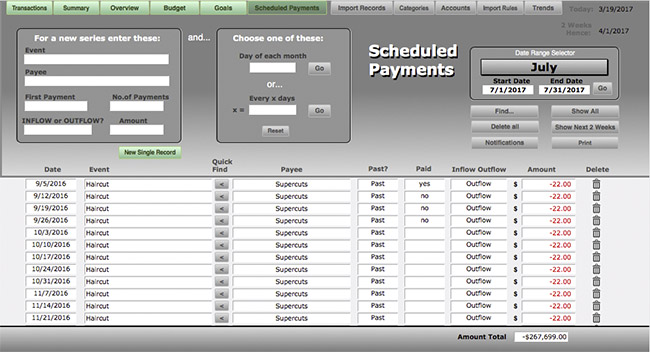
And finally there is a green Scheduled Payments button that takes you to a page that allows you to set up and track up-coming payments and expenditures.
________________________
GETTING STARTED
Logging in
BudgetWrangler comes with two user accounts, User 1 and User 2. You can’t change the names but you can change the password for either one. They both have the same initial password which can be found in the README_Installation document that ships with BudgetWrangler. You should change this password immediately.
File > Change Password...
Note: The User 2 account is READ ONLY. You can look at the data but you can’t change it when logged in as User 2. You can use this account to give access to someone who needs the information but you don’t want them to be able to alter your data.
SETTING UP
You’ll need to do a few preliminary steps to prepare your BudgetWrangler database so that it can properly accept your downloaded Bank data.
1. Delete the Sample Data
BudgetWrangler comes with some test data installed so that you can examine how it works before you start your own budget process. Once you have poked around and familiarized yourself with the general functionality and you are ready to begin your own budget you’ll need to delete all the existing fake records. To do this go to the Transactions Window, click the Grey “Show All” button, and then select Scripts > Delete All Data.
Note that once you do this deletion some of the buttons and functions in BudgetWrangler will not work properly since you now have no data to sort. To fix this…add some data. (See ADDING YOUR DATA below.) But there is a bit more setup to do first.
ALSO NOTE that if you instead were to choose Scripts > Delete All Transactions it would not affect your lists of Accounts, Categories, or Import Rules. You need to edit each of these separately.
In Accounts simply select each field and edit the content.
In Categories you can either edit the individual categories directly or hit the Delete All button and start fresh.
In Import Rules you can either click the X next to each Rule to delete it or select Records > Delete All Records.
2. Create Your CATEGORIES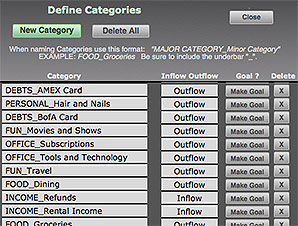
Next you’ll want to set up your spending and income Categories. Click the Grey “Categories” button and the Categories sub-window will appear. You can “delete all records” there and start your own or you can modify the existing ones to suit your needs. Or you can add new ones one at a time by hitting the “New” button.
NOTE: Make sure you also set up whether each category is for “Inflow or Outflow”. This is needed for analysis later on.
SPECIAL NOTE on CATEGORY NAMES:
The category names in the test data take the form of “MAJOR CATEGORY_SubCategory.” Notice the underscore “_” between the major category and subcategory names. You will need to use this underscore as a divider in all your category names, even ones with no subcategory!
We strongly recommend that you follow this format because BudgetWrangler uses everything before the underscore as a Major Category grouping to sort your categories and subtotals on the Summary Page and elsewhere. So for instance entries categorized as “INCOME_Salary” and “INCOME_Gifts” and “INCOME_Rental Income” all get sorted under “INCOME” and you get a subtotal of everything that starts with “INCOME” on the Summary Page. Having both a major and subcategory name in each category name may seem a bit quirky. But it keeps things simple and it works nicely so use it to your advantage.
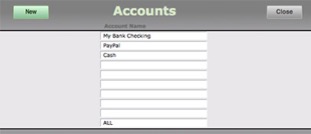
3. Create Your Accounts List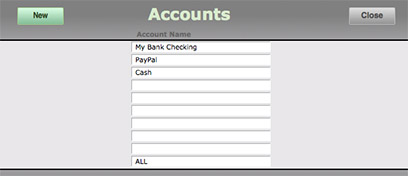
Next you’ll need to set up your Accounts. These are the names of the bank accounts you wish to track in BudgetWrangler. Click the Grey “Accounts” button and you’ll open the sub-window that allows you to name your Accounts. Typical entries might be “BofA Checking” or “PayPal”. This list will then get attached to buttons that allow you to Import records to a given account in the “Import Records” window and will become the selection list in the Account Selector pulldown.
PLEASE NOTE:
• Only 12 Accounts can have an “Import Records” button available for them in the Import Records dialog window.
• Also, make sure that you retain an item in this Account list labelled “ALL”. It will help you to display the records you wish to view.
CREATING A BUDGET
There are several ways you can go about setting up your budget. You may wish to do so now before you enter any Transaction Data. But you may want to wait until after you have entered at least several months worth of Transactions because then you can use the YTD Monthly Average field in the TRENDS window to help you determine monthly category amounts for more accurate budgeting based on your historical data. If this is preferable to you skip ahead to the next section: ADDING YOUR DATA.
There are three different windows devoted to aspects of budgeting:
YEARLY BUDGET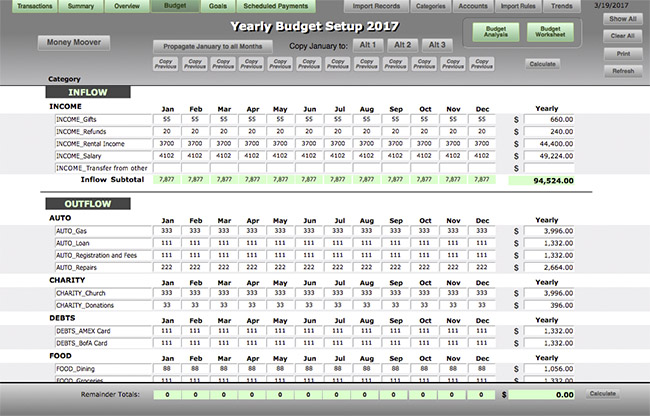
Clicking the green “Year Budget” button brings up your yearly budgeting template. It has all your categories listed on the left with each month of the year getting its own column. It’s best to start with the month of January because there are several buttons that allow January to be copied “to” and “from” in order to speed up your workflow. The goal of course, when entering your income and expenditures in this January budget is to make the “Remainder” field in the footer below this column equal or exceed zero.
The figures in the Yearly Budget are what BudgetWrangler uses to compare with your actual Transaction data in other windows and budgeting functions.
You can copy a month to the next or even fill all months with the same data if you desire, by simply using the buttons at the top of each column in the “Yearly Budget” page.
BUDGET WORKSHEET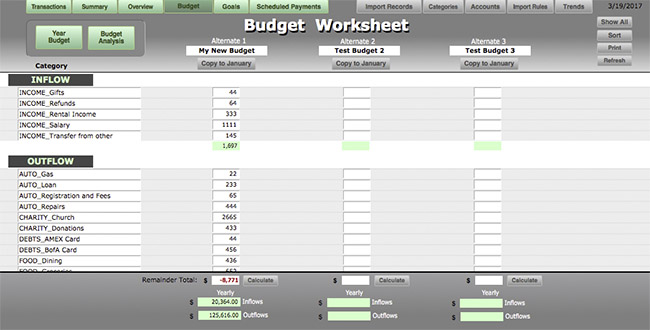
Clicking the green “Budget Worksheet” button brings up a window that has three alternate “Test Budget” columns. Each one represents a sort of scratch sheet for a monthly budget scenario. You can experiment with various scenarios until you get something you are happy with. When you are ready, click the “Copy to January” button and the test budget will be copied over to the real “Yearly Budget” page.
Likewise in the Yearly Budget page there are three buttons in the header that will allow you to copy the January budget to one of these Alt Budgets for further work. When you are finished, you can copy it back.
BUDGET ANALYSIS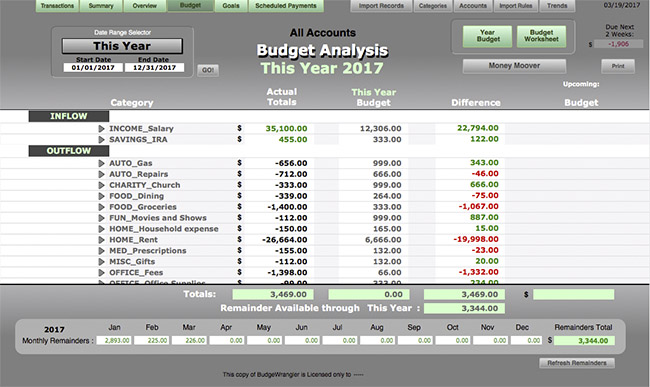
Clicking the green “Budget Analysis” buttons brings up a window that is the heart and soul of why BudgetWrangler exists. It shows you, based on the month or period selected in the Date Range Selector pulldown, your actual category expenditures compared with the amounts you budgeted and it shows you the difference.
In the footer at the bottom of the window you can see the “Monthly Remainders”, the amount left over (if any) from your budgeted amount at the end of each month. So you can quickly see how much you can safely move into savings or, if the number is negative you can start to figure out where the problems lie.
The Magic Number
One more thing. Just above the Monthly Remainders on the Budget Analysis page is a field labeled “Remainder Available through
The Money Moover
At the top of the Budget Analysis and the Yearly Budget Pages there is a grey button labeled Money Moover. Clicking on this brings up a dialog that you can use to move budgeted funds from one category to another or one month to another to even out your budget and see more green numbers than red. It’s much the same as moving money from one envelope to another in an envelope budgeting system.
ADDING YOUR DATA
One Record at a Time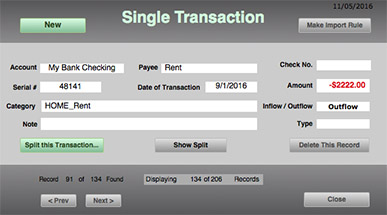
One way of getting your data into BudgetWrangler is the brute force way, one record at a time, entered manually. Even with more automated input there will still be times that this method will be useful, like entering a starting balance for an account, for instance, or recording that cash purchase at Starbucks.
To create a single record go to the Transactions page and click on the grey “New Transaction” button below the BudgetWrangler logo.
Importing Records
Now we come to the most important step of making BudgetWrangler useful to you: Importing Records from your Bank. Some financial software will do this automatically for you (generally for a fee). But you can achieve the same thing for free with BudgetWrangler and even have more control over the process than with other software.
Doing the import can be a bit tricky since every financial institution does things differently. (Which is also why the online services are so unreliable.) There are commonalities among institutions of export formats such as .csv or .qif files. But even then one bank may use a different term for the same field from what another bank uses— “amount” vs “net” for instance.
But chances are you don’t have that many bank websites and download formats that you need to wrestle with. And once you get it all set up and working it will go MUCH easier the next time. (And if you start creating Import Rules, even easier after that. )
But for now bear with us. We’re going to get through this…
First of all you should know that even though a given bank download may contain 20 or more fields of bank data per record BudgetWrangler only uses five or six of those, depending on the institution. So all you have to do is ensure that those five or six fields get imported in the right place in BudgetWrangler and you can ignore the rest. We’ll be showing you some examples below.
IMPORTING STEP #1— Outside of BudgetWrangler, obtain a .csv file. (This stands for “comma separated values”.) .Csv is the lowest common denominator of database formats. Almost anything can read or write it. AND most institutions allow you to download .csv records directly from their website. To the left is the PayPal download dialog. You may have to search a while to find it on your particular site, but it is probably there. Look for links that say “History” or “download” and you should be given a choice of formats. PayPal for instance allows a number of different KINDS of .csv downloads. (In their case always use “Comma Delimited—Completed Payments.”) You can also typically choose the date range for the transitions you wish to download. More on that in the next section.
EXCEPTION and another option— Partners Federal Credit Union for example allows the download of a number of different formats including .csv files, and Quicken's .qfx format files. BUT! it turns out that the data supplied in those options is different. It is more complete in the .csv but more useful in the .qfx format.
Currently BudgetWrangler does not directly import .qfx format. (Doh!) But if this is the best data available from your institution what to do? Easy workaround: Apple’s “Numbers” application opens .qfx files directly and then you can export .csv files from there. You can then import the converted .csv file into BudgetWrangler. The conversion takes about ten seconds. And while you’re in Numbers you can also edit the data if you wish and certainly inspect it so that you know the names of the fields and what they do so you can import into BudgetWrangler properly. Other formats such as .qif may need to run through a third party converter to obtain a .csv.
HINT: You can preview the contents of any csv file by simply single clicking on it in the Mac Finder and hitting spacebar. Opening in Numbers or Excel also works.
BE AWARE: It has come to our attention that some financial institutions export .csv files that show all transactions as absolute values or only positive numbers(!) BudgetWrangler requires that imported records of expenditures contain a minus sign in front of the dollar amount for each entry. So watch out for this.
TIME OUT:
Now that you’re breathing hard and getting sweaty palms REMEMBER: You’ll only have to go through this setup once per account. After that it’ll be easier I promise… Go get a cup of tea and then come back and keep reading.
THE DOWNLOAD DIALOG
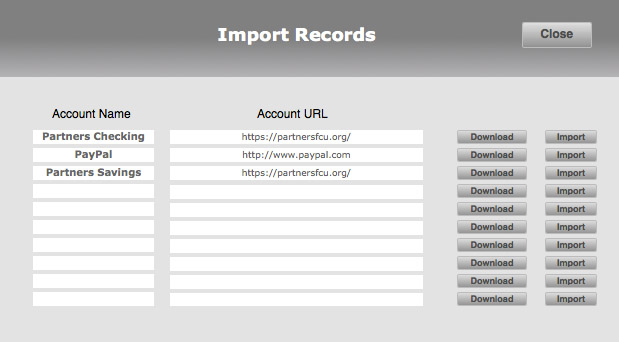
When you’re ready to import your .csv file go to the Transactions page in BudgetWrangler and click the Import Records button.
![]()
This brings up a dialog where you see your accounts on the left. You can enter the URL of your Bank’s download page so that you can get there faster next time by clicking the Download button next to it in this dialog.
Once you have your .csv downloaded to a safe place on your computer return to BudgetWrangler and click the Import button next to that account in the Import Records window. Navigate to the .csv file you wish to import and double click it. You will be presented with the Filemaker field mapping dialog interface. More on that in a second, but first let’s understand what we are actually importing.
BUDGETWRANGLER IMPORT FIELDS
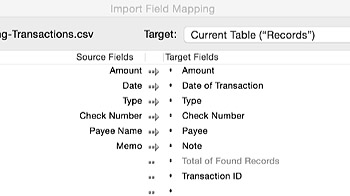
The fields that you will be seeking to import to have the following names INSIDE BudgetWrangler:
Date — The date of the transaction
Payee — who is paying you or getting paid from you
Type — Check, Debit Card, Transfer etc.
Amount — the amount of the transaction. (Duh!)
Check Number — Again, Duh!
Note — This varies from bank to bank. You want it to contain something like “Vacuum Cleaner” or “movie rental” so it’s descriptive. So look for the field that has something like that and it goes in this field. Some banks just have terms like “BillPayment, Withdrawal” in this field. And don’t confuse it with the Payee—sometimes they are very similar.
You simply need to match up these BudgetWrangler field names with the field names that the bank uses. To do this Filemaker provides a nifty way of matching the fields:
When you click on a .csv file to import into BudgetWrangler you’re presented with an interface that looks like this:
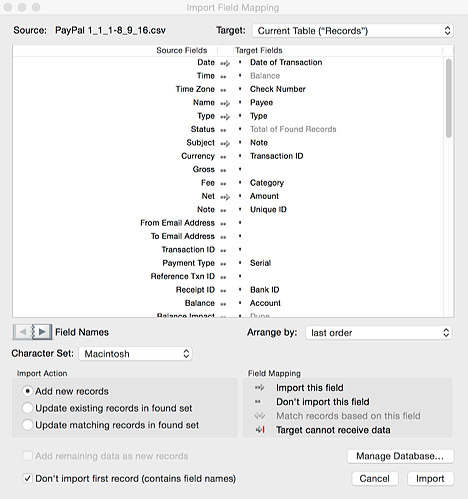
The above is the import interface for a PayPal account. Note that only the fields with the ARROWS will be imported. PayPal fields are on the Left and BudgetWrangler fields are on the Right.
The above image illustrates how a PayPal import should look when set up. If your PayPal import doesn’t exactly match this, drag the little arrows around until the fields match up with the ones desired. Note that once you have done this the “Arrange by:” pulldown should be set to “last order” so that theoretically you only have to do this field matching once for each Import button. And the next time you import to this account all you have to do is find the file and hit OK.
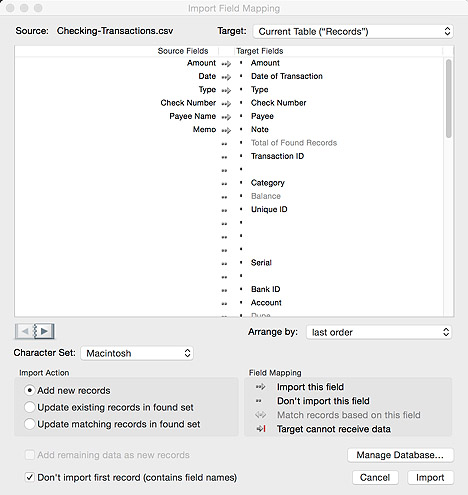
Here’s what a Partners Federal Credit Union Import setup should look like:
Once you hit the Import button the data will fill in the fields in BudgetWrangler and you are presented with a “FOUND SET” that contains only the records you just imported. Take a look at them. If something went seriously wrong with the import you can always blow them away by choosing Records > Delete Found Records. And then try again, perhaps moving the little matching arrows around until you get something that looks right.
A WORD ABOUT DUPLICATE RECORDS
The enemy of accurate financial database record keeping is the creation of duplicate records. Yet if you happen to import records from the same date range into BudgetWrangler from the same bank source you will automatically generate duplicates. That’s the bad news. The good news is that BudgetWrangler is watching for this and can help you manage it. The BEST solution is never to import the same records twice by monitoring the date range of the records you download. Simply check the latest dated record in BudgetWrangler for the Account of interest and then download only records after that date from the bank.
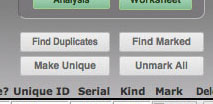
But just in case a double import happens BudgetWrangler searches for duplicates and flags the second record of a pair as a “dupe” in the “Dupe?” field on the Transactions page. So you can click the “Find Duplicates” button on the Transactions Page and display only duplicate records.
You then have the option to either delete the duplicates (Records > Delete Found Set )or click the “Make Unique” button which will keep the records but give them unique identifiers so they are no longer labeled as a “dupes”. This function exists because sometimes you actually have legitimate multiple records that occur on the same date with the same Payee for the same amount. They look like copies but they are actually unique transactions. (This happens more often than you might expect.) Unfortunately YOU have to figure it out. If you are certain that this is the case and you want to keep all the records in your found set of duplicates after you click the “Find Duplicates” button you can safely click the “Make Unique” button. If on the other hand you are convinced they really are redundant dupes, blow them away. Records > Delete Found Records
Yet another way of viewing “dupes” along with their “originals” is to select Scripts > Show Duplicates with Siblings to display both originals and dupes to assure yourself that there are no differences.
(NOTE: Selecting the Scripts > “Make Dupes in List Unique” function while displaying records this way is not recommended. Make sure to use “Find Duplicates” before using the Scripts > “Make Dupes in List Unique” function.)
MORE SAFETY: BudgetWrangler further helps your duplicates-managing process by insisting that you make a decision on any EXISTING dupes before you are allowed to import new records. You’re welcome.
IMPORTING DATA FROM A PREVIOUS BUDGETWRANGLER FILE
Occasionally you’ll find the need to import all your data from another Budgetwrangler file. A common reason for this would be if the program were updated and you wanted to start using the latest version.
The process is not difficult, but to be clean and tidy unfortunately has a lot of steps. Follow the recipe below and you should be fine.
First of all be aware that a BudgetWrangler data file contains five, count em five tables of information: Records, Categories, Import Rules, Accounts, and Payment Schedule. To upgrade your BudgetWrangler you’re probably going to want to move your data from each of these. Unfortunately Filemaker makes us do them separately.
1. Start with an fresh BudgetWrangler file from the download.
2. Delete all sample data by going through each of these pages Transactions, Categories, Import Rules, Accounts, and Scheduled Payments and in each one of them do the following:
Records > Show All Records
Records > Delete All Records
TIP: Alternatively you can select Scripts > Delete All Data
3. Now you have an empty copy of BudgetWrangler. It’s time to import the data for each table from your previous BudgetWrangler file. So again navigate through each of the five pages and for each one do the following:
Select File > Import Records > File…
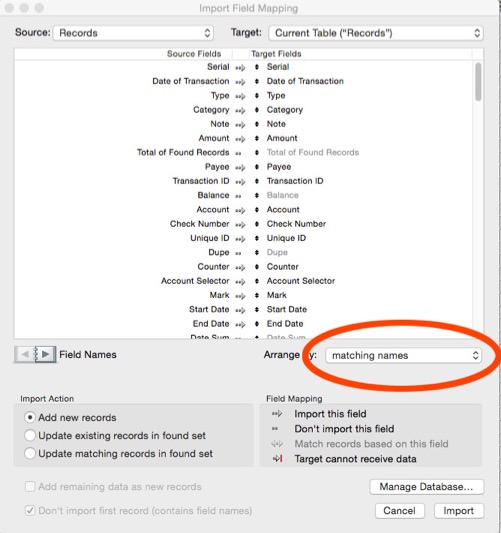
Navigate to the file you wish to import from and double click to open. The Filemaker Import field mapping dialog appears. First, make sure the two Tables listed as Source and Target at the top of the window are the ones you wish to transfer. In the “Arrange by” pulldown in the lower right of the field mapping dialog, select “Matching Names” and click the Import button.
In the next dialog make sure that the “Perform auto-enter options” box is CHECKED and that the repeating fields “Keeping them in the original record” option is selected if available. Click import.
Now move on to the next of your five pages/tables and repeat all the steps in #3 above. When finished you’ll have a new copy of BudgetWrangler with your data safely imported.
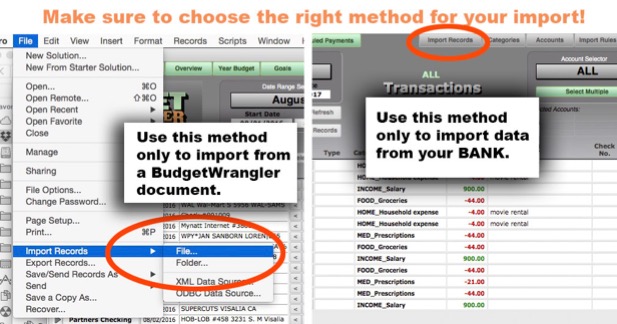
A NOTE ABOUT IMPORTING METHODS
There are two ways to import data into BudgetWrangler. One is to select File > Import Records > File… This method should ONLY be used to import from another BudgetWrangler File. To import your Bank Data go to the Transactions page and click the “Import Records” button in the upper right..
SPLITTING TRANSACTIONS
Suppose you go to Walmart. You pick up a few groceries. But you also buy a bunch of DVDs of your favorite movies. These items probably belong to different categories; the groceries go in the FOOD category and the DVDs in the ENTERTAINMENT category. And yet it’s only one receipt for one transaction. What to do?
Why split the transaction of course! If you want to be ultimately accurate in your record keeping do this:
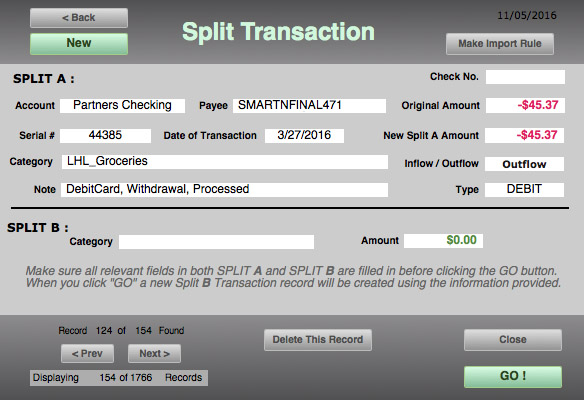
Once you’ve imported the transaction data from your bank and categorized it, click on the arrow to the far left of the Transaction’s line in the Transactions Window. This opens up the Single Transaction sub-window and shows you all the details of the transaction according to the bank. Click on the green “Split this Transaction” button. This expands the Single Transaction Window to become the Split Setup Window. Here all the details of the transaction are in the A Split partition. To split this amount simply choose an amount and category for the B Split.
If all the necessary fields are filled in, when you click the “Go!” button the single transaction becomes two transaction records, each with its own amount and category, totaling the original single transaction amount. Please note that this process cannot be undone easily, so pay attention to what you’re doing. If you wish to split the original transaction further, simply split one of the resulting records using the same procedure until you’ve achieved the accuracy you need for your record-keeping preference. Each of these new Transaction records will carry an identifier in the Notes field that allows you to relate them all back to each other by pressing the “View Split” button in the Single Transaction window.
BASIC “FIND” AND “SORT” TECHNIQUES
There are several common techniques in BudgetWrangler/Filemaker that will allow you not only to work more nimbly with your data, but identify and correct problems when they occur.
FIND
• If you want to find all of the records that contain a certain text string such as “Starbucks” in a given field do this:
Go to the Transactions Page in BudgetWrangler if you are not already there by clicking the green Transactions button in the upper left.
Select View > Find Mode
This enters you into Find Mode (duh) where you can enter “Starbucks” in the Payee field and hit RETURN.
• The same technique works if you wanted to find, say, all the “Starbucks” expenditures between January 20 and January 29. To do this:
Go to the Transactions Page in BudgetWrangler if you are not there by clicking the green Transactions button.
Select View > Find Mode
Type “Starbucks” into the Payee Field and “1/20/2016…1/29/2016” in the date field. (The ellipsis defines a range)
Hit RETURN.
![]()
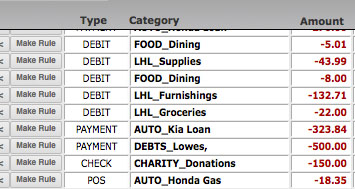
• On the Transactions page there are some shortcuts to help you in your finds.
1. There is a FIND button (that also enters you into FIND mode).
2. There is a small arrow button next to each Payee field. Clicking this button will find all the records that contain the first few characters in that Payee field.
3. There are the MARK field and the FIND MARKED and UNMARK ALL buttons. By clicking the MARK checkbox next to any records of interest and then clicking the grey FIND MARKED button the result is a “Found Set” of those marked records. Once you have this found set you can delete all of them by selecting Records > Delete Found Set. Or you can look at all the records that are NOT marked by selecting Records > Show Omitted Only.
SORT
In the Transactions window you can sort your data simply by clicking on the column headers. In addition you can click the grey SORT button and get a dialog box where you sort your data in sophisticated ways. This same dialog can be accessed on any page by selecting: Records > Sort Records.
For more information about Finding and Sorting in Filemaker go to:
http://www.filemaker.com/help/12/fmp/html/find_sort.5.1.html#1027519
ASSIGNING CATEGORIES
Now that you’ve imported your records you come to the potentially tedious task of assigning categories to your transactions. Every transaction MUST have a category in order for BudgetWrangler to help you.
Luckily there are several ways of doing this. These range from semi-tedious to something actually approaching FUN:
1. ONE AT A TIME: You can do it one record at a time by going to the Transactions page and clicking on the “Category” field on any record to select a category from the pull-down list. (Better than typing but no fun for a lot of records.)
2. AUTO FILL: Similarly you can click on the “Category” field and start typing. BudgetWrangler will do the auto-fill and you can find your category quickly that way.
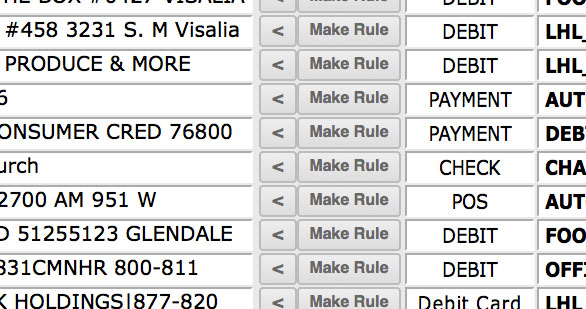
3. QUICK FIND: Sort the list of found records by Payee by clicking on the Payee column header. You will then see groupings of records from the vendors you frequent. If you click on the little grey left arrow “<” button next to a payee, BudgetWrangler will do a search for all the records that contain the first four characters in that field. This isn’t always perfect at finding everything from that vendor but it gets you started narrowing down to a group of records you want to assign a category to.

Refine your set of found records—If some in this found set are not what you want you can use the “Mark” checkboxes on the right of the list to select and mark only the records to which you want to assign the same category. (Start by clicking the Grey “Unmark All” button to clear any checked boxes. “Unmark All only applies to the currently visible records.) Next check the boxes of the records you wish to categorize and click the grey “Find Marked” button. This gives you a found set of only the records that have been marked.
But you haven’t assigned any category yet.
Categorize a Group of Transactions—To assign a category to all items in the found set do the following: Assign a category to the first record in the list by following steps 1 or 2 above. Then click once in the Category field and select: Records > Replace Field Contents… You will then see a dialog box with the top button’s option being Replace with “MYCATEGORY”. (The words MYCATEGORY represent what should be the text of the category you just selected for the first record. ) Click Replace and Voila! A bunch of records with the same category! Much faster than doing one at a time. ( NOTE: This works with an entire Found Set so make sure all records in the set are records that you want to have this category assigned to or you could screw things up. You did back up your file didn’t you?)
You can use this same technique with any other Found Set. For instance you could do a “find” for Burger King expenses by clicking the grey “Find” Button, typing “Burger King” into the Payee field and hitting Return. You now have a found set of which you can assign all records to the category of “Dining”. ( If of course you consider Burger King to be dining.)
For more info on “Find and Replace” Techniques please refer to:
http://www.filemaker.com/help/12/fmp/html/find_sort.5.26.html#1029145
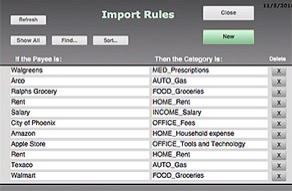
IMPORT RULES
And then there’s my favorite—IMPORT RULES! If you have a lot of records with the same Payee month after month it’s smart to set up some Import Rules. That way the next time you do a data import BudgetWrangler knows that “Burger King” is in fact “Dining” and will automatically assign that category to every “Burger King” record you import. To create an import rule: first find a payee in your existing list on the Transactions page that you want to make a rule out of. Make sure its Category field has a category assigned and is not empty. Then simply click on the small grey “Make Rule” button next to the Payee field. You can click on the Grey Import Rules button and you will see your new Import Rule at the bottom of the list.

That’s it. You’re done. It’s all set up, waiting for that next Burger King import.
Since it takes a moment to process your records for each import rule you’ll want to keep their numbers as lean as you can. If you use the same vendor but pay with a different bank’s credit card the contents of the Payee field may be different and the Import Rule will appear not to work. No problem. You could just make another Import Rule to cover that vendor with the different bank. Or better, you could truncate any given rule to cover what you want to and nothing more. For instance if you have entries that you ate at Taco Bell #1 and Taco Bell #2 and Taco Bell#3 you can cover all of them by setting only “Taco Bell” in the Payee field of your Import Rule. If you manage your import rules well the majority of your records get categorized on import and all you have to do is fill in a few outliers and one-offs. Sweet!
Import Rules RULE!
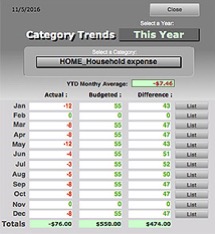
TRENDS
BudgetWrangler allows you to check your activity on a month by month basis for any category. Simply click the grey “Trends” button at the top of any major window. Choose a category from the pulldown in the upper left and you are presented with monthly totals of records for the chosen category for the current year. Cool huh! Months that are in the future show a total of zero.
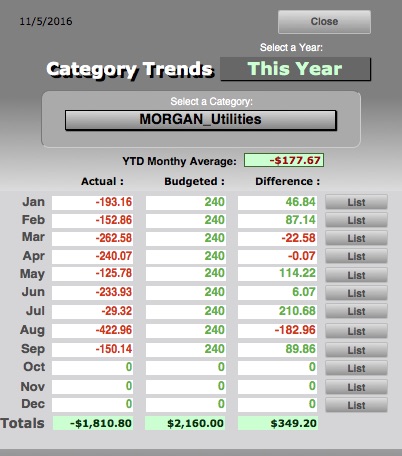
In addition you can see what you budgeted for that category for each of those months and the difference. This page allows you to see the trends and maintain or alter your course accordingly.
The Trends window also shows you another very helpful piece of information: As noted above in the Setting Up a Budget section, Trends has a green field labeled YTD Monthly Average. So if you select a category from the pull-down this field will show you your average monthly expenditures for that category for this year. The more months of this year that have elapsed, the more meaningful the average will be. This field provides a very good starting number to use for setting up your budget for that category.
TIP: Keep the Trends window open while you work on your budget in the Yearly Budget window.
GOALS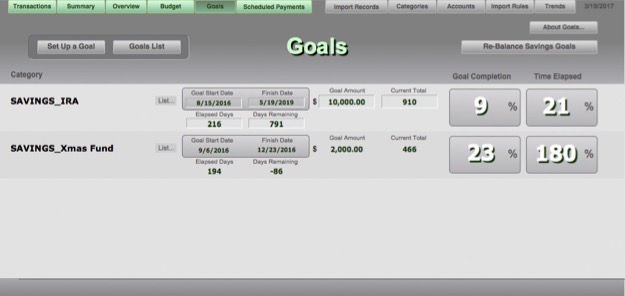
By clicking the green “Goals” button you can manage and examine your progress on spending or a debt payment goal. Goals are simply categories that have been flagged as GOAL in the “Goal?” field. This alerts BudgetWrangler to track them and display them on the Goals page.
By clicking the “Set Up New Goal” button on the Goals page you are presented with a dialog window to help you create your goal. You can either pull down and select an existing category in the Category field or create an entirely new Category just for your new goal.
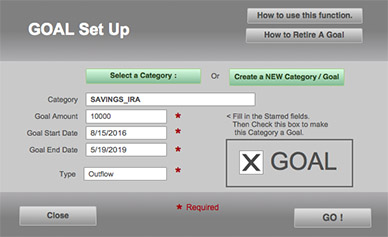
To do so, click the appropriate top green button. In each case, make sure you set up the goal amount, the start date and the end date so that BudgetWrangler can track your progress. Click the checkbox next to the word “GOAL” and your Category has become a Goal ! Now whenever you make a transfer to your savings account and categorize it with this Goal category it will be logged and tracked and displayed as a percentage of this goal on the Goals page.
GOALS TIPS AND TRICKS
SAVINGS GOALS
Let’s say you want to save up for a new Motorcycle. You would create a new Category and call it something like “SAVINGS_Motorcycle Fund”. You would assign it as a GOAL in the Inflow/Outflow field either on the “Set Up a New Goal” dialog or on the “Goals List”. So now every time you get a few spare dollars you transfer or deposit them to your Savings account and then categorize that deposit as “SAVINGS_Motorcycle Fund” in BudgetWrangler.
The same technique can be used for a SAVINGS_Christmas Fund or SAVINGS_College Fund. And the cool thing is—they can all be in the exact same Savings account! What BudgetWrangler is allowing you to do is to set up and manage VIRTUAL SAVINGS ACCOUNTS by CATEGORY. But if you are going to “manage” these accounts how do you do that?
On the upper right of the GOALS page is a grey button labeled “Rebalance Savings Goals”. Clicking that button opens a small sub window that allows you to make VIRTUAL TRANSFERS from one Goal Category to another (much like the Money Moover). The money all still remains in the Savings account. But if you have an emergency or you just want to get that motorcycle sooner you can Virtually transfer some of that savings money from another GOAL category to the Motorcycle Fund. BudgetWrangler does this by creating pairs of VIRTUAL TRANSFER records in the Transactions list. Since they are always in pairs—one subtracting from a category and one adding the same amount to another category the bottom line always remains the same. You have merely re-labeled the earmark for those dollars you “transferred”.
The result of these behind the scenes transfers is a set of VIRTUAL records. They are harmless and usually hidden from view but if you would like to examine them select: Scripts > View Virtual Transfers.
DEBT PAYMENT GOALS
Paying down a debt such as a credit card can also be assigned as a goal in the same way as a Savings goal—simply ensure that the category is assigned as a GOAL in the Goals List (Grey Button on the Goals Page). After you give your debt payment goal a start and end date along with an amount every normal payment that you make toward that goal is tracked as a percentage of your goal on the GOALS page.
USING BUDGETWRANGLER ON A MOBILE DEVICE
As we have seen, BudgetWrangler can help you manage a lot of information. As such it was created primarily to be used on a desktop or laptop computer. It is possible to use Filemaker’s FREE Filemaker Go app to use BudgetWrangler on your mobile device .
You can download BudgetWrangler via iTunes to your mobile device and run it directly from there. It will not sync with the cloud or anything else this way but you can do it.
You can theoretically share your data among your devices using Dropbox and Filemaker Go. Check this page to see if this is for you.
Finally the best way to run BudgetWrangler for any and all devices is by having it mounted on a server using Filemaker Server software. Then you can access it from any device including a web browser from anywhere in the world with Internet Access. Unfortunately you’ll have to find a Filemaker Hosting service to do this, and they typically start at about $20 a month.
For more information on Filemaker Go and Filemaker Server go here.
SCHEDULED PAYMENTS
The Scheduled Payments function in BudgetWrangler is only for guidance, scheduling, and notification purposes. The “scheduled” items do NOT actually affect your Transactions data in any calculations within BudgetWrangler. They are informational only.
Hitting the green Scheduled Payments button takes you to the Scheduled Payments Page where you can input recurring events, give them a date and then have BudgetWrangler remind you when they are coming up.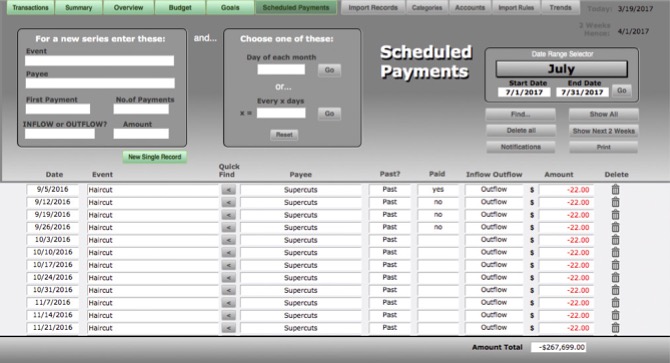
You can enter a single event by clicking the New Single Record button. (Make sure you fill in all fields to ensure that Scheduled Payments works properly.)
For a payment that is recurring such as a paycheck or rent you can create a series of records that can be scheduled for a certain day each month or at any daily interval (such as weekly) that you choose.
To do this: Fill out all the fields in the upper left box on the Scheduled Payments page. (Event, Payee, Etc.) For best results do not leave any field empty.
Then choose ONE of the items in the center box, either “Day of each month” or “every x days” and place a number in that field. Click the GO button next to that field. A series of events will appear in the list below. You can sort this list by clicking on the column headers. Like the Transactions page the Scheduled Payments page also has a “quick find” arrow button next to the Event field. By clicking this you can quickly display only the events that match the one selected. This is handy if you want to delete them all. (Records > Delete Found Records ) or if you want to find and replace some item in the series.
NOTE: For more info on “Find and Replace” Techniques please refer to: http://www.filemaker.com/help/12/fmp/html/find_sort.5.26.html#1029145
NOTIFICATIONS
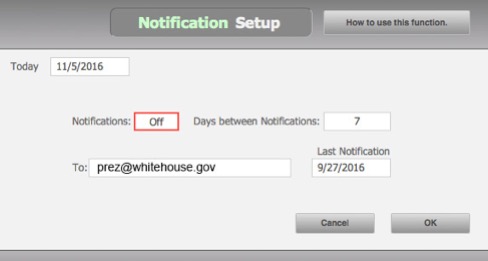
Once you have your Scheduled Payments set up you can have BudgetWrangler notify you by email at an interval you choose of the payments that are coming up in the next two weeks. To turn Notifications on select: Scripts > Notification Setup or click the Notifications button on the Scheduled Payments window. Click on the Notifications field and select ON or OFF, set the number of days between notifications, and enter the email address you wish the notification sent to. Finish by clicking the OK button.
NOTIFICATION CAVEATS:
1. If BudgetWrangler is not in operation no notification will be sent. BudgetWrangler sends any pending notification automatically only upon startup. You can manually send the notification by selecting Scripts > Send Periodic Notification.
2. If the Notification email is going only to you and since BudgetWrangler will only send it if you’re using BudgetWrangler, an easier way to view the same information is by using the green Due Next 2 Weeks button on the Scheduled Payments page. If the notification is going to someone else its regularity will only be as regular as your use of BudgetWrangler.
REPORTS
So you need to print out a yearly summary to give to your tax man? The Summary, Budget, and Overview Pages are formatted to print out cleanly. They ARE your reports. Just print them to paper or PDF.
If for some reason your printer driver is doing strange things to the printout, try altering the scale field in the Page Setup dialog. File > Page Setup…
SELECTING A CURRENCY
If BudgetWrangler opens showing a currency symbol that is not your preferred currency simply click on the existing symbol and select the appropriate alternate symbol from the resulting pop-up. All currency symbols in BudgetWrangler will now reflect your selection.
BACKING UP YOUR DATA
Once you have started entering data into BudgetWrangler we strongly encourage you to back up your file periodically by doing the following:
In the BudgetWrangler application select: File > Save a Copy as… You can save your backups anywhere you wish, but a good place would be the BACKUPS folder inside the BudgetWrangler 1.x Mac folder.
Remember that If you ever need to actually return to a backup and use it instead of your main BudgetWrangler Data.fmpur file do this:
1. Quit BudgetWrangler if it is open.
2. Rename your main BudgetWrangler Data.fmpur file to something like BudgetWrangler Data OLD.fmpur and put it in a safe place.
3. Rename your backup that you wish to use to the name BudgetWrangler Data.fmpur and drag it out of the BACKUPS folder back into the main BudgetWrangler 2.x folder. if you are using a Mac.
For more detailed info on Filemaker Pro operations and capabilities please go to Filemaker.com